Main window
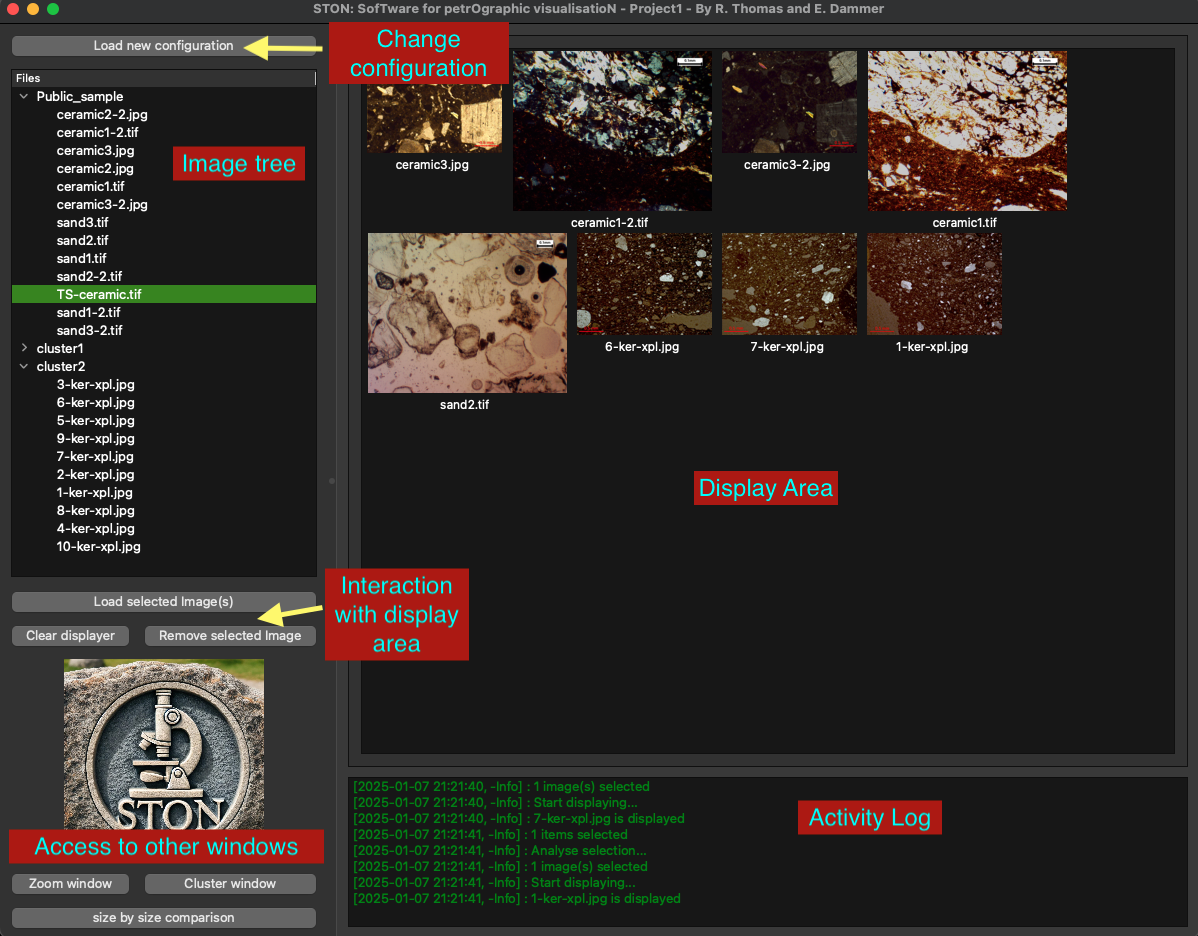
Main window of STON
The main window is composed of three main areas:
On the right the display area allows you to have a look at thumbails of images. They are all displayed in the display area. The size of the thumbnails is controlled via the option Image_width in the configuration file. Each image is displayed with its name attached underneath.
On the bottom right the activity log informs you about what STON is doing and might show error and warning messages. It is good practive to have a look at it.
On the left a column including the following elements (from top to bottom):
Button to load a configuration file: Instead of closing STON to load a new configuration file you can use that button
The Image tree where the files are displayed.
Three buttons that allow you to interact with the display area on the right.
At the bottom, three buttons allowing you to access other STON windows (see below for details).
Image tree and display area
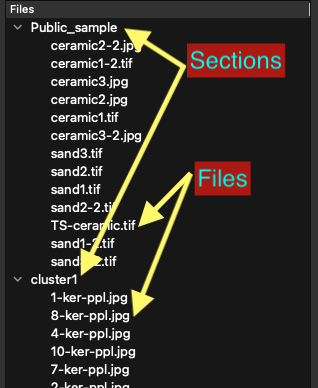
The Image tree has two levels: sections and files (see image on the left). Sections are names of directories where images were found and files are image names. The image tree only displays images whose extension match the ones given in the configuration file and located in the directory given as well in the configuration file. It is worth mentioning that STON will recursively look as well at all the subdirectories. If files with matching extension are found, a new section in the tree is created with the subdirectory name. For example:
If the directory given in the configuration file only contains images with matching extensions, a single section with the directory name will be created.
It the directory contains also, for example, two subdirectories populated with images with matching extensions the image tree will create three sections (one for the top directory and two for the subdirectories).
If a directory (or subdirectory) does not contain any image with matching extension, it will not appear as a section in the image tree.
To load images in the display area:
You can do it one by one: a double click on an image in the Image tree will load it on the display area. You can also select the image and press the button Load selected image(s).
If you select multiple images (using the keyboard keys shift and/or control, as you would do on a normal file explorer), you must then press the button Load selected image(s).
Removing images from the display area:
If you want to remove a single image from the display area, select it in the display area and use the button Remove selected image. You can select multiple images at once as well.
To clear the display area from all images, a simple click on clear displayer will do the trick.
Sending image to other windows
The three bottom buttons on the left give access to the other windows of STON. They allow for deeper explorations of the images.
zoom window: The Individual image visualisation window is unique in the sense that you can only display a single one of them. When clicking on that button, the zoom window will appear, a second click will hide it. To send an image to that window you need to double click on an image in the display area. The image will directly appear on the zoom window.
cluster window: Grouping images can be done in the cluster window. This gives access to mashup creation, group list export and meta image creation. To access it you must select at least one image in the display area.You can open multiple cluster windows.
Size by Size comparison: This window allow you to Compare images allow you to compare images side by side. To be able to open that window you must select two (and only two) images in the display area. If you select a number of images different from 2 the window will not be created and a message will be displayed in the activity log. You can open multiple comparison windows at.